This article explains how to use the My Tickets interface to manage tickets throughout their entire lifecycle, i.e. from the moment they are opened until they are closed.
The interface gives access to an overview of requests to technical support. You can also easily consult the status of the technical support. You can also easily consult and edit up to what they are resolved your convenience. Finally, you can rate the technical support service.
Prerequisites
Enter the following address in your web browser: https://my.planethoster.com.
The My Tickets Interface
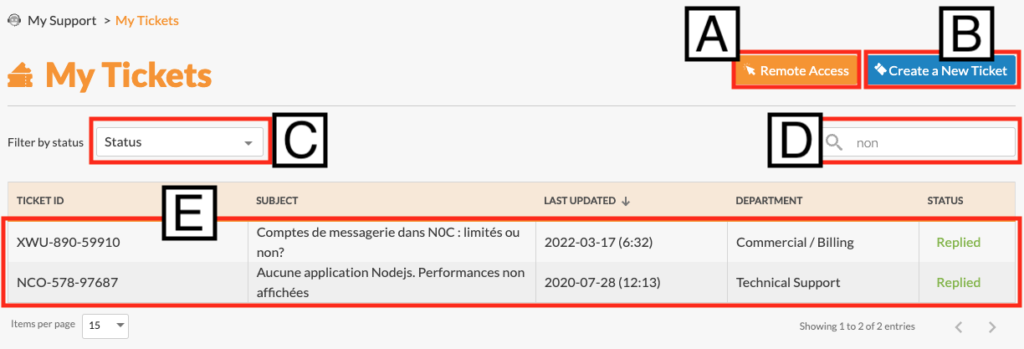
Go to My Support -> My Tickets in the menu:
| Fonctionnalité | Remarque | |
|---|---|---|
| A | Remote Access button. | Opening of the interface for remote access. |
| B | Create a New Ticket button. | Opening the interface Create a New Ticket. |
| C | Filter by status button. | Access to the drop-down list allowing tickets to be filtered according to the progress of their resolution by support. |
| D | Search field. | Enter text in the field: tickets containing this text will appear in the raised ticket display. |
| E | Display board for tickets raised. | – TICKET ID: unique identifier for the ticket. – SUBJECT: text of the initial request as is. – LAST UPDATED: time at which the ticket was last updated. – DEPARTMENT: department responsible for resolving the ticket; Technical Support, Commercial / Billing or Sales, as appropriate. – STATUS: progress in resolving the problem. |
Definition of the Different Statuses
| Définition | |
|---|---|
| Replied | We have provided an answer. |
| Opened | We have received the ticket or response you provided and will respond shortly. |
| In progress | Processing in progress (support is still trying to resolve the issue). |
| Closed | Solved. |
| Validation | Verification in progress. |
| Install request | HybridCloud deployment, installation of CloudLinux, LiteSpeed, etc. |
| To do | We cannot resolve the ticket at the moment, but the task is planned. |
How to Filter My Tickets by Status
It is possible to display only tickets in a given status:
- Click on the drop-down list displaying the status options and tick the desired status:
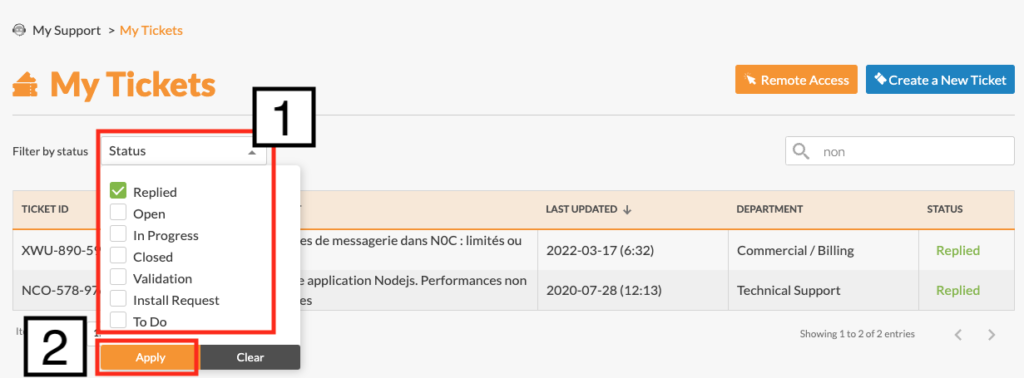
- Click on the Apply button.
- The tickets are then displayed. Click on the Clear button to display all the tickets again.
How to Manage a Ticket
Once you have created your ticket, you are likely to enter into a written dialogue with a member of Technical Support. You will then need to edit the ticket to view the answers provided and provide clarifications, until the ticket can be closed.
- Click on the TICKET ID :

- This interface is displayed:

| Functionnality | Comments | |
|---|---|---|
| A | The history of communications with support. | The most recent message is displayed at the top and the oldest at the bottom. |
| B | Field allowing you to write to technical support. | Please provide as much detail as possible in this field to enable us to help you. |
| C | Section for adding attachments. | Clicking on Add attachment(s) or drop file(s) here will bring up an interface allowing you to add attachments, one at a time. |
| D | The YES option allows you to share your password securely. | You will need to enter your password, as only you know it. The password is encrypted and is only visible to support staff. We keep the password for a period of 7 days. |
| E | The Mark as resolved button confirms that you consider your problem to have been resolved. | You can then evaluate the technical support services. |
| F | The Reply button appears in blue when the information can be sent to support. | Your comment will be recorded. |
How to Evaluate Technical Support Services
When you click on the Mark as resolved button, you will see the message Please rate our services, with three icons allowing you to indicate your level of satisfaction.
The evaluation interface depends on the icon chosen.
| Functionnality | Comments | |
|---|---|---|
 |  | Explain in detail what happened. You must have a valid complaint and not just a technical problem that can be resolved by creating a normal ticket. Click on the Send message button when you have finished. A notification will be displayed to confirm that the message has been sent. |
 |  | We encourage you, by clicking on the button representing social networks or web opinion forums, to leave your opinion or share your experience. |