Introduction
The admin-ajax.php file is an integrated service in WordPress. It is based on the Ajax model (Asynchronous JavaScript + XML)¹.
The admin-ajax.php file allows WordPress to make updates interactively, without having to refresh the entire page. For example, WordPress can send MySQL queries to the database and the information is returned without even refreshing the page.
By default, WordPress directs all Ajax calls via the admin-ajax.php file. Since the admin-ajax.php process is not cached in the WordPress core, it is normal for WordPress to use resources (by default, often inefficiently) depending on the nature of the Ajax actions.
Because hits often occur on admin-ajax.php, this article aims to demonstrate how to analyze the use of this file in WordPress. At this point, a diagnosis is needed to determine which plugin or setting is causing unnecessary hits, so relevant actions can be taken appropriately.
References
The article Using WordPress on N0C explains how to connect to WordPress.
Prerequisite
Go to https://mg.n0c.com/en/.
admin-ajax.php Process Hits
We must emphasize first that admin-ajax.php is not bad in itself, quite the contrary. However, due to its direct and uncached nature, there may be cases of hits due to wasted resources resulting from requests for HTTP and HTTPS protocols generated directly on the web server processing them.
There may be a variety of reasons for hits on your site. For example, a particular plugin consuming a lot of Ajax may be combined with high traffic. It can also happen that the WordPress dashboard has been opened for too much time (several hours): at that point, admin-ajax.php could start wasting resources.
In the following sections, we will explain how to perform analyses to find the causes of hits.
How to Analyze the Hits of admin-ajax.php
Activating the Amuga Ajax Log Plugin
In order to track and log actions that hit admin-ajax.php, you need to install a special plugin called “Amuga Ajax Log“. This plugin allows you to determine exactly what is happening on admin-ajax.php and to make an informed choice on the actions to take in order to rectify the situation. The plugin can be obtained from the WordPress website: https://wordpress.org/plugins/amuga-ajax-log/.
As the use of the pluginmay cause CPU / MySQL load, it is imperative to disable it once the analysis is done.
To install Amuga Ajax Log with N0C:
1. In N0C, go to CMS/Applications > N0C WP:

2. Choose the site and click on the Details icon.
3. Click on the Add Plugin button:

4. Search for the Amuga Ajax Log plugin:

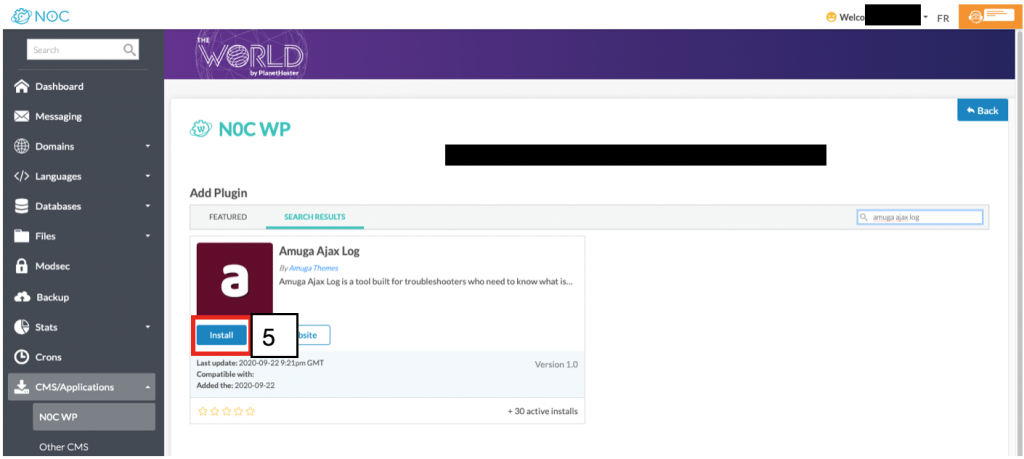
5. Click on the Install button:

6. Click on the Activate icon to activate the Amuga Ajax Log plugin:

7. Exit N0C and open it again.
8. Go to the WordPress administration by clicking the Connection icon next to the site:

9. Confirm that the plugin appears in the upper left corner of your WordPress Dashboard:

Analyzing the Hits of admin-ajax.php
1. After waiting a few hours for the plugin to collect the data, click on Amuga Ajax Log to display the Leaderboard and Recent Hits List tools:

2. The Admin-Ajax Leaderboard section clearly shows which WordPress feature is hammering Ajax the most, so you can determine where the hits are coming from. The process with the highest value in the Total column is your number one suspect; in this example there is a lot of heartbeat:

3. A little further down on the same page, the section named 50 Recent Admin Ajax Hits gives more details:

4. You just have to see which plugin has saturated Ajax requests and see how to reduce its usage. Sometimes, an alternative plugin could be considered. Sometimes, it will be necessary to adjust the settings of the plugin in order to reduce its footprint. Disabling the affected plugin may even be necessary to confirm that the hits are indeed coming from it.
Adjusting the WordPress Heartbeat
It is normal that you see a lot of heartbeats in the most demanding admin-ajax processes. In fact, heartbeat is the WordPress process that makes sure to synchronize your posts and your interactive pages².
For a WordPress installation that is intended to be static, it is possible to get a lot of performance by adjusting the heartbeat to reduce its footprint on your web hosting resources. This can be accomplished using the Heartbeat Control plugin, which can be found at: https://wordpress.org/plugins/heartbeat-control/.
To install the plugin:
1. Search for the “Heartbeat Control” plugin, then click on the Install button:

2. Click on the Activate icon:

3. Access the WordPress administration by clicking the Connection icon:

4. In WordPress, go to Settings and Heartbeat Control:

5. Typically, you must disable the Heartbeat for the Frontend and Backend, except for the Post editor:
- WordPress Dashboard > Disable Heartbeat
- Frontend > Disable Heartbeat (static sites)
- Post editor > Allow Heartbeat
6. Save the changes by clicking on the SAVE CHANGES button.
Conclusion
We hope that this article has helped you learn more about admin-ajax.php in WordPress and that you will be able to better handle it.
¹ Readers interested in learning more about Ajax can consult a guide available at the link: https://developer.mozilla.org/docs/Web/Guide/AJAX.
² More information is available on the official WordPress page: https://developer.wordpress.org/plugins/javascript/heartbeat-api/.
