To find out about all the necessary steps for migration, please consult the article explaining how to migrate your website to PlanetHoster.
It explains that two steps depend on your current host: copying the files and copying the database onto your computer. In the following lines, we will explain these two steps in the case of a website hosted with Bluehost.
How to Copy the Files
A copy of the files on the IONOS service have to be downloaded to your computer. This will enable you to transfer them to your new PlanetHoster hosting via FTP.
- Login to your Bluehost account.
- Click on the Hosting tab on the navigation menu (left).
- Click on CPANEL to open cPanel.
- Open the option FTP Accounts in the section Files.
- When the cPanel FTP Accounts page is opened, you can see the FTP configuration parameters:
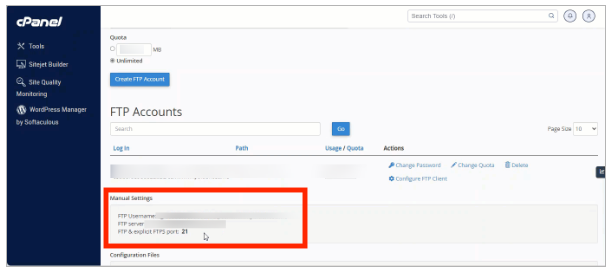
- Take note of the following:
- active FTP or SSH user (FTP Username);
- server address (FTP Server);
- default server connection port (21).
- Make sure you know the password associated with this FTP or SSH user. If you do not, you will need to change it.
- Open an FTP session with FileZilla and fill in the Host, Username, Port and Password fields, then click on the Quick Connect button.
- Once connected, select the contents of the www folder (web site root) in the Remote site section and download it to your computer. If you do not know where your website folder is located:
- Login to your Bluehost account and click on Websites.
- Select the website and click on SETTINGS :

- On the next screen, scroll down to the Quick Links section.
- Click on FILE MANAGER.
- Document Root is displayed:

When this is done, you have to copy these files via FTP to your hosting in the public_html folder for your main domain. Please refer to the article How to Migrate your Website at PlanetHoster.
How to Copy the Database
In order to migrate the database to PlanetHoster, you must first create a backup file on your computer. We will show you how to do this from Bluehost phpMyAdmin database manager.
- Login to your Bluehost account and click on Websites.
- Select the website and click on SETTINGS :
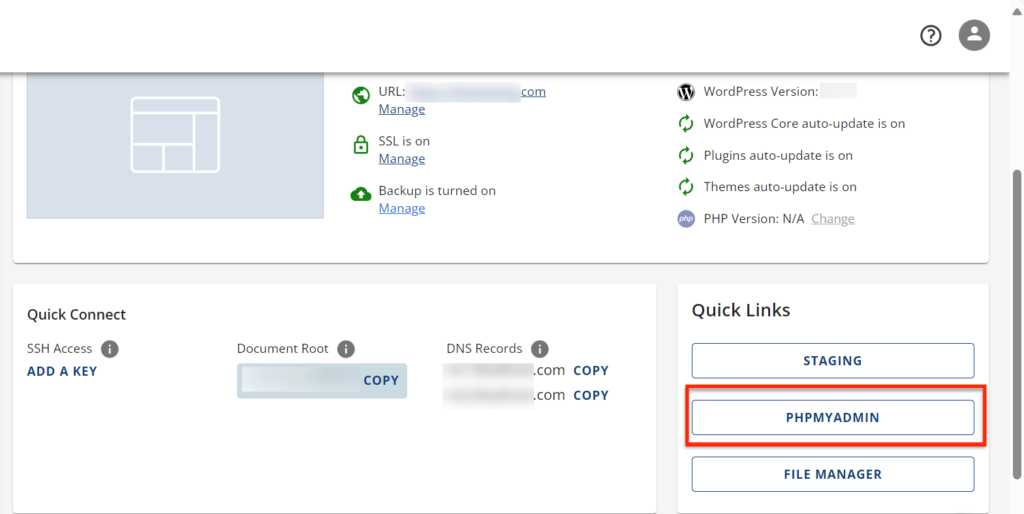
- On the next screen, scroll down to the Quick Links section.
- Click on the PHPMYADMIN button:
- You are now in Bluehost phpMyAdmin tool. Click on the applicable database, on the left.
- Click on the Export tab.
- In the phpMyAdmin database export tool, choose the Quick Method export method and the SQL format, then click on the GO button.
- Your web browser will then offer you the choice of opening or saving the file. Select Save and make a note of your local download directory on your computer, as you will need this file in .SQL format for later.
You then need to create a database on your PlanetHoster hosting, import the previously exported database into this new database and, finally, modify your connection configuration files to the database of your website with the new information previously generated during the creation of the database. Please refer to the article explaining How to Migrate your Website to PlanetHoster.