The Domain management interface in V2 gives access to an overview of the domains. It also allows you to manage several domains at the same time.
Prerequisites
Enter the following address in your web browser : https://my.planethoster.com.
Displaying Domains
- Go to Domain Names -> Domain Management.
- The domains are displayed on the right (clear the cache or log in again if you have trouble opening the interface):

| Definition | |
| DOMAINS | Names of the domains. |
| NEXT INVOICE | Date of the next invoice to be paid. |
| STATUS | Indicator that shows whether the domain is Active, Suspended or Cancelled. If a request is being processed, the status Pending is displayed. |
| ID PROTECTION | Indicator of whether the WHOIS protection is enabled or not. |
| LOCK | Indicator of whether the domain is locked or not (safety feature preventing others from trying to transfer your domain). |
| MANAGE | Icon to access to the interface allowing to manage the selected domain. |
Filters
The Filters drop-down list is used to filter the display of domains by Status.
- Click on the Filters drow-down list:

- Check the status boxes to refine your search.
- Click on the Filter button to launch the search and display only the domains matching the defined criteria.
- To remove all filters and display all domains again, click the Clear button.
Actions On Many Domains
The Actions drop-down list allows you to process several areas at once:

We will see how this list allows to:
- Renew domains.
- Lock domains.
- Change the nameservers that domains point to.
- Edit contacts associated with domains (WHOIS information).
Renewing Domains
It is wise to protect your domain name(s) by adding years. The longer the registration period, the better off you will be, because the cost of domains increases from year to year as a result of variations.
In the Domains interface, click the Actions drop-down list and choose Renew. This opens the Domains: Renew interface:

| Definition | |
| DOMAINS | Names of the domains. |
| REMAINING TIME (DAYS) | Number of days to expiration (i.e., number of days between the expiration date and the registration date). |
| RENEWAL PERIOD | Drop-down list giving access to the various renewal options, taking into account that a maximum of 10 years of domain name protection is possible. |
The renewal is done as follows:
- Choose as many domains as you want to renew at once:

- For each selected domain, specify the RENEWAL PERIOD in the drop-down list of the same name:

- Click on the Renew button at the bottom of the interface.
- Saving will open your invoice, which we suggest you pay immediately.
Locking Domains
Locking domains is a security measure that prevents them from being transferred to another registrar without your knowledge.
In the Domains interface, click the Actions drop-down list and choose Lock. This opens the Domains: Lock interface, where all your unlocked domains appear. To lock them:
- Choose the domain or domains you wish to lock:

- Click on the Lock button. Locked domains are immediately removed from the list.
Modification of the Nameservers
It is possible to choose which nameservers you want your domains to point to.
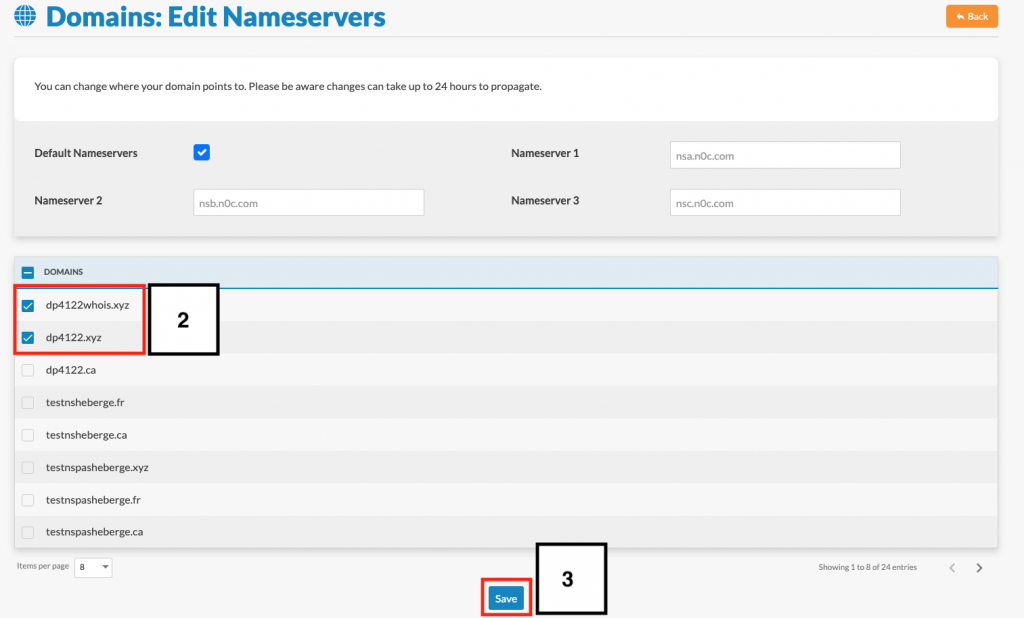
In the Domains interface, click the Actions drop-down list and choose Edit Nameservers. This opens the Domains: Edit Nameservers interface. To edit nameservers:
- Determine the nameservers. You have two options:
- 1A — You can choose the default PlanetHoster Nameservers, which will be displayed automatically, by checking the box with the same name.
- 1 B — Alternatively, you can define up to five different nameservers by filling in the appropriate fields (Nameserver 1, Nameserver 2, etc.).

- Choose the domain that owns these nameservers (you can choose several domains at once if they have exactly the same nameservers):

- Click on the Save button.
Modification of the Contacts
It is absolutely necessary that contact points are defined for exchanges related to your domains.
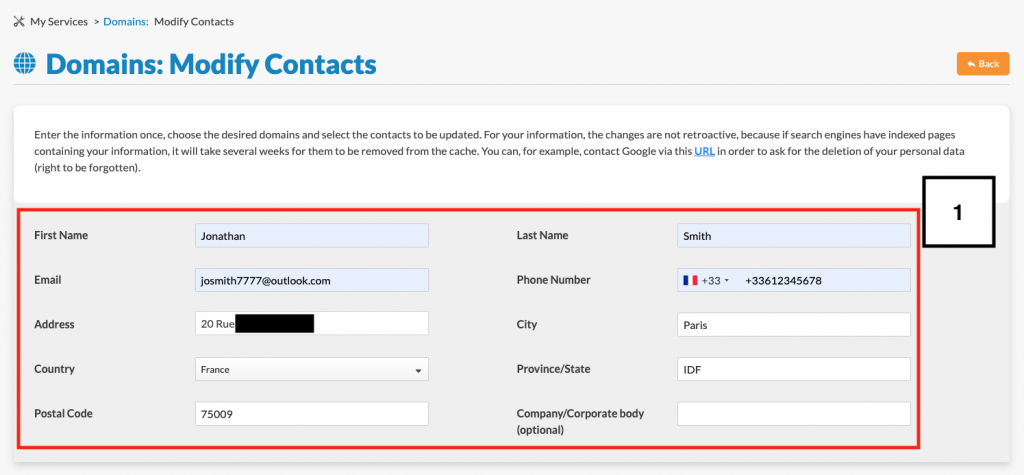
In the Domains interface, click the Actions drop-down list and choose Edit Contacts. This opens the Domains: Edit Contacts interface.
- Enter the information to identify the contact:

- Select the contacts to be updated using the appropriate checkboxes:

- Click on the Save button.
- A confirmation message is displayed.
Management of a Single Domain
With a single click, it is possible to access the interface to manage a specific domain (how). This can be done in two ways:
- The first method is to click on the name of the domain.
- You can also click on the gear icon opposite the domain :

