The interface in V2 gives access to multiple functionalities specific to the management of a domain.
In this article, we will take a brief look at this interface. As we go along, detailed articles will be referenced.
This article applies to all domains acquired or transferred to PlanetHoster, whether hosted or not.
Prerequisites
Enter the following address in your web browser : https://my.planethoster.com.
Access to the Interface
Go to My Domain Names -> Domain management.
- Click on the domain to be managed:

- The Domain management interface appears :

Account Informations
In the upper left corner of the interface, the domain name is displayed in blue. In addition, a link to the domain’s invoice is available if you need to pay attention to it. Finally, the Account Informations as such is centralized:

| Account Info | Definitions |
| Registration Date | Date when the domain was first registered at PlanetHoster. |
| Status | The status can be : -Active: the domain is usable. -Cancelled: the domain no longer exists. -Pending: the domain is not yet available. -Suspended: the domain is temporarily unavailable. |
| Expiration Date | Date on which the domain will automatically expire if it is not renewed by then. |
| Days Until Expiration | Number of days between today’s date and the expiration date. |
| Next Invoice Due | Deadline by which the invoice must be paid. |
| Payment Method | Payment method on the invoice associated with the domain. |
| First Payment Amount | Amount of the first payment made for this domain. |
| Recurring Amount | Amount paid for automatic renewal. |
Domain Options

Account Permission
It is possible to allow any user of another account with PlanetHoster to use the domain name on their own The World hosting plan.
To do so, you just need to enter the email of this user associated with your PlanetHoster account and click on the Allow button. A message will then confirm the success of the operation.
WHOIS Protection
Private WHOIS allows you to hide the information usually available through WHOIS servers (please refer to the article How to Activate the Private WHOIS On a Domain Name for the details).

Locking and Unlocking, and Transferring a Domain Name from PlanetHoster to Another Registrar
With PlanetHoster you can lock your domain, so that no one can try to transfer your domain without your knowledge.
On the other hand, if you decide to transfer a domain from PlanetHoster to another registrar, any lock must be disabled beforehand, otherwise you would not be able to recover your AuthInfo.
This portion of the screen allows you to easily activate or deactivate the lock. Thus, if it is activated, you will see this:
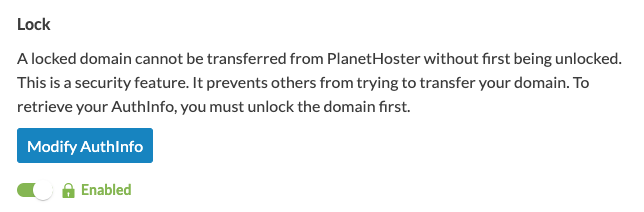
If the lock is disabled, the Retrieve AuthInfo by Email button is available:

The Modifiy AuthInfo is useful if needed, too.
Please see the article How to Obtain an AuthInfo Code for a Domain Name to obtain more details.
DNSSEC
DNSSec is a security technology that encrypts the information returned by your DNS server(s). You must configure it on your web server and activate it on your domain, as explained in the article How to Enable and Disable DNSSEC.
If your domain is not hosted at PlanetHoster, you can click directly on the Activate DNSSEC button.
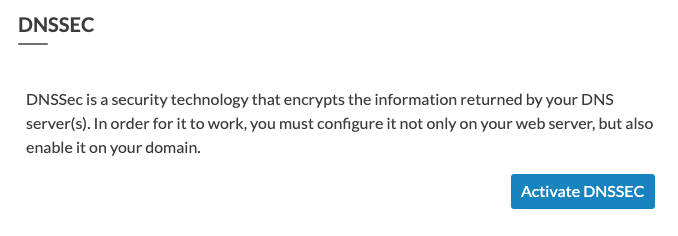
On the other hand, if your domain is hosted at PlanetHoster, you should use the hosting panel.
Automatic and Scheduled Renewal
When the Automatic Renewal option is enabled, PlanetHoster will automatically generate a new invoice for you 20 days before the domain expires (please refer to the article How to Cancel Domain Name and Activate Auto-Renewal).
You can also plan a domain name renewal over several years (please refer to the article How to Plan Domain Name Renewal Over Several Years).
Desactivation of the Domain
It is also possible in this interface to delete your domain name registration (please refer to the article How to Delete a Domain Name Registration).

Transfer a Domain
You can decide to transfer your .co.uk domain to another registrar. You just have to enter the tag of the new registrar and click on the Send button:

WHOIS Informations
It is absolutely necessary that contact points are defined for exchanges related to your domains (veuillez vous référer à l’article How to Change the WHOIS of a Domain Name).
How to Confirm a Contact
You may occasionally see this message:

This means that the contact must confirm his identity with dnsbelgium, as explained in the article Belgium (.be) Domain Specifications.
Nameservers
It is possible to choose which nameservers you want your domains to point to (How to Modify the Nameservers of a Domain Name).
DNS Management and Domain Redirection
DNS Management
You may need to create and modify zone records to control the operation of the DNS. The steps to follow depend on whether the domain is hosted at PlanetHoster or not.
Domain Hosted at PlanetHoster
If your domain is hosted at PlanetHoster, DNS management can only be done from N0C (or cPanel, if the transition was not done). As a matter of fact, you will see the message Please use your hosting panel to change these values, as illustrated below:

Domain Not Hosted at PlanetHoster
If your domain is not hosted at PlanetHoster, PlanetHoster N0C name servers (nsa.n0c.com, nsb.n0c.com, nsc.n0c.com) are used and no DNS zone exists yet, you will see the Create DNS Zone button:

Under the same conditions, except that your DNS zone has already been created, the Open DNS Manager button is immediately displayed:

In short, you must :
- if required, create a DNS zone using the Create DNS Zone button;
- click on the Open DNS Manager button;
- use the DNS Management interface to modify your DNS zone (How to Manage DNS):

Domain Redirection
Customers who do not have a hosting account with PlanetHoster have the ability, from their member area, to do redirects. In other words, they can redirect their registered domain to any domain, as explained in the article How to Redirect Your Domain to Another (Webpage, Facebook, Twitter, Likedin, etc.).
Glue Records
The Activate GlueRecords button allows you to create your name servers (How to Register Custom Nameservers on HybridCloud).

Registry Lock
The registry lock provides additional protection for the domain for which it has been activated (please refer to the article How to Manage the Registry Lock).
Sub-Contacts
It is possible to allow one or more sub-contacts to see the details of a domain and even manage its settings:
- Go to My Account – > Contacts – > Add New Contact and fill in the fields to identify him.
- Check the box under Activate Sub-Account, choose the appropriate Sub-account Permissions (View Domains and/or Manage Domain Settings) and click on the Submit button.
