Introduction
The HTTPS protocol allows visitors to a website to communicate securely with the PlanetHoster server. Thanks to our partnership with Let’s Encrypt certification authority, all PlanetHoster hosting have SSL certificates for free. The use of this certificate is optional, but recommended, and requires a configuration at your website to use it. We will tell you in detail how to set up your WordPress installation so that it uses the HTTPS protocol.
Update the URL in the backoffice
In order to put the URL in the backoffice, one must follow the following steps:
1- Log in to your WordPress backoffice via yourdomainname.ext / wp-login.php. We will use securisation.planethoster.org/wp-login.php in our demonstration:

2- In the menu of your dashboard, navigate to Settings -> General:

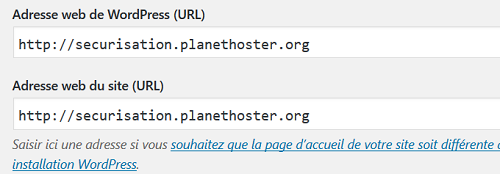
3- Once on the general settings configuration page, simply update the fields named “WordPress web address” and “Site web address” (URL) by replacing the “HTTP” with “HTTPS”:

4- Remember to save the changes by clicking on the blue “Save Changes” button at the bottom of the General Settings page after these changes:

Congratulations! You have activated the HTTPS protocol for your WordPress site via the backend!
Update the URL via phpMyAdmin
Another way to do the previous step is to go directly via the phpMyAdmin tool that is easily and directly in your N0C panel or in cPanel.
- In your N0C panel, find the section named Database and click phpMyAdmin. If you prefer to use cPanel, find the section named database and click phpMyAdmin:

- You are then redirected in the phpMyAdmin interface. Click first on the database of your WordPress and then, on the table wp_options:

- Update the “siteurl” and “home” options so that they are in HTTPS. Press the enter key on your keyboard in the input field and the backup will be instantly applied in the database:

Congratulations! You have just updated the URL of your WordPress site via the phpMyAdmin tool.
Fix content errors in WordPress
Following these manipulations as well as the implementation of the HTTP to HTTPS redirection via the .htaccess file as described here: https://docs.planethoster.com/guide/techniques-tools/ssl-comment-rediriger-http -to-https-from-the-htaccess your site will now be in HTTPS, but it could be that one or more errors persist and that would prevent a completely secure connection. This means that one or more resources on your website are not loaded using the HTTPS protocol. It may be content loaded from outside or simply that during the development of the site the registered URLs were not in HTTPS. In order to fix such errors, we recommend installing the WordPress Insecure URL Fixer module. Here’s how to do it:
- Log in to his backoffice at: yourdomainname.ext / wp-login.php, In this case, we will use securisation.planethoster.org/wp-login.php with your username and password:

- In the menu of your dashboard, click on Extensions and Add:

- On the “Add Extensions” page there is a convenient search field. Type “SSL Insecure Content Fixer” and WordPress will take a moment to find you. Click the button named “Install” to install it:

- Then, click on the “Activate” button to activate the SSL Insecure Content Fixer extension:

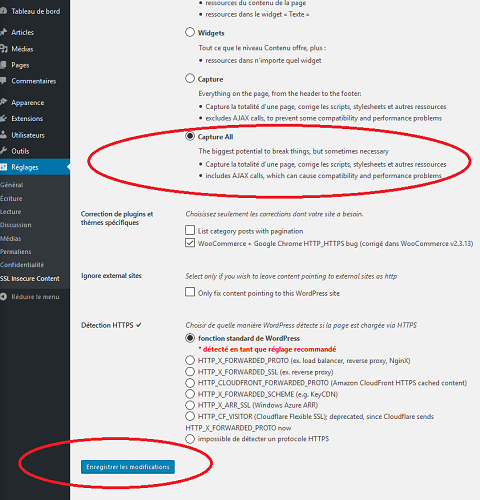
- Finally, you are on the extensions page, the last manipulation will be to configure the plugin to capture all traffic and allow it to correct mixed content errors in CSS and JS files. To do this, click Settings:

- Check the “Capture ALL” method and save the changes:

Congratulations! You have fixed the mixed content error in your WordPress.
Manual way: “The hard way”
A more advanced way to correct this concern is described on our forum at the following address:
https://forums.planethoster.com/threads/eviter-lavertissement-non-securise-dans-chrome.4970/
