Introduction
General information about your HybridCloud hosting is centralized in a user-friendly interface. Among other things, the interface also lets you adjust resources. You can also modify and cancel services.
This article explains how to use this interface.
Advantages of the Approach of PlanetHoster
The offer of PlanetHoster, which enables the creation of several independent N0C accounts rather than offering a single access to an account, provides high availability.
This unique approach represents a key — and often overlooked — advantage for our customers.
Prerequisites
Enter the following address in your web browser: https://my.planethoster.com.
Access to the Interface
- Access to Billing -> Hostings.
- Click on the PRODUCT that interests you or on the MANAGE icon :

- When you do so, the interface appears:

Description of the Interface
General Information
This information is displayed in the top left-hand corner of the screen:

The table below details its meaning:
| Meaning | |
|---|---|
| Status | Indicates whether the Web Project is Active, Suspended or in another status. |
| Domain | Web Project name. |
| Registration Date | Date on which the Web Project was created. |
| Dedicated IP | Main IP address. |
| Localisation | Dedicated server location (country and city). |
| Web Server | Chosen web server (N0C by default). |
Billing and Related Invoices
This information is displayed in the bottom left-hand corner of the screen:

The following table details the meaning of this information:
| Meaning | |
|---|---|
| Billing Cycle | Frequency at which the recurring amount is paid. The frequency can be changed by clicking on the pencil icon1. |
| Recurring Amount | Amount systematically paid according to the billing cycle. |
| Next Invoice | Date on which hosting will expire. |
| Payment Method | Payment method used (credit card, PayPal, etc.). |
| Renew Now | Button allowing you to renew your hosting according to the chosen billing cycle. An invoice is then produced. |
| Related Invoices | Invoice numbers linked to the account. Invoices can be accessed by clicking on them. |
Resources
This information is displayed in the top right-hand corner:

The following table explains the meaning of each:
Personal Notes
This information is displayed in the top right-hand corner:

The article How to Use the Account Details explains how to add and modify such notes (the procedure is identical in the account details interface).
Accounts List

The Account list button takes you to the list of accounts as it appears in the Web Hosting – > Resource Management – > HybridCloud (dedicated) – > account, where “account” stands for the name of the account (please refer to the article How to Manage HybridCloud Resources).
AutoPeakPower (APP) – Burst Power
For HybridCloud, the AutoPeakPower indicator (APP) provides the time during which the boost was applied during the month:
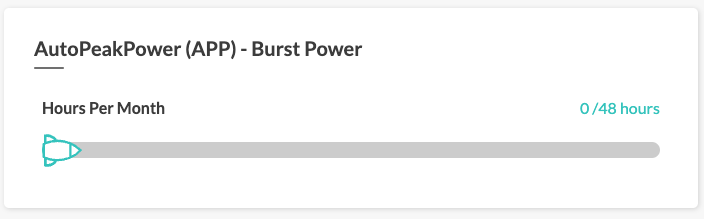
This function is extremely useful. In fact, if your server experiences a very high influx of visitors and, as a result, your dedicated resources start to run out, APP automatically increases your resources. Your CPU and RAM resources are increased by 2.5 times, up to a total of 48 hours. As increases are in blocks of 4 hours, you are entitled to 12 free boosts per month.
This saves you the hassle of logging into your customer area and adjusting resources accordingly.
Please refer to the article What is AutoPeakPower (APP) – Burst Power? for more details on this feature.
Modification of the Plan
You can choose the server resources and package that best suit your needs.
- Click on the Modify Plan button at the very top of the screen:

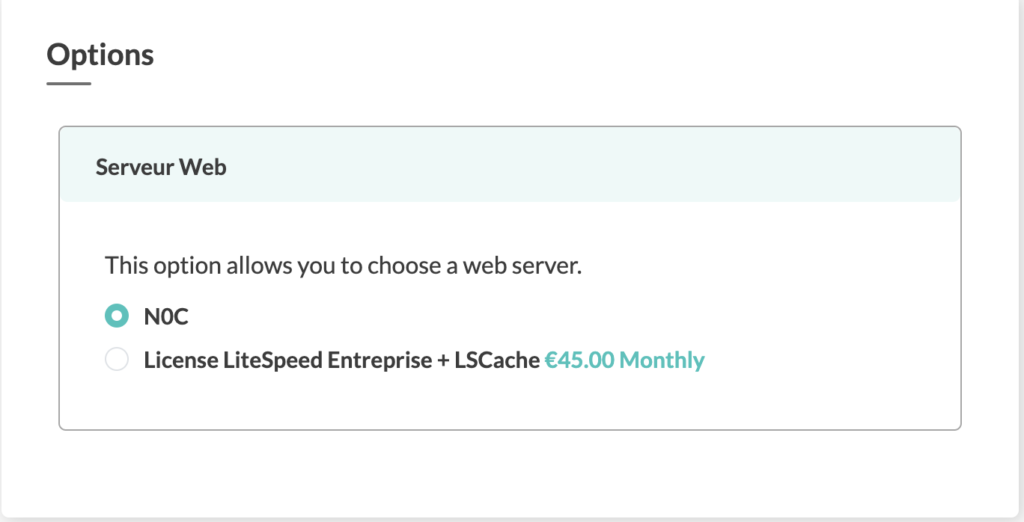
- Choose a web server:
- Use the “+” and “-” buttons to adjust the plan. You will automatically see the invoice cost change accordingly, at the very bottom of the screen :

- Click on the Apply button at the bottom of the interface.
- The Update Summary provides details of the invoice.
- Click on the Continue button :

- The invoice is displayed.
- Pay the invoice.
HybridCloud Package Cancellation
Should you wish to interrupt your hosting:
- Click on the Cancel Package button:

- This opens the product cancellation request interface:

- Enter the Password of your client account (this is the same password you use in the Member Area Login window).
- Use the Reason for Cancellation drop-down list.
- PlanetHoster uses this information for statistical and continuous improvement purposes.
- If you choose Other, you have to provide the details manually.
- Use the Cancellation Type drop-down list to indicate whether the cancellation should be made at the End of billing period or should be Immediate.
- Click on the Cancel the Account button.
- Definitions: monthly (twelve times a year), quarterly (four times a year), semi-annual (twice a year), 1 year (once a year), 2 years (biennial, i. e. every two years) and 3 years (triennial, i. e. every three years). ↩︎